Transfer history pages
PERMISSIONS Admin access to the QuickBooks data file and security level with permission to configure the QuickBooks Extension. Refer to Admin security settings.
NAVIGATION Left Navigation Menu > Admin > Admin Categories > Extensions & Integrations > QuickBooks Extension > Invoice Transfer History | Expense Report Transfer History | Timesheet Transfer History | Purchase Order Transfer History | Inventory Synchronization History
NAVIGATION Left Navigation Menu > Contracts > Invoices and Adjustments > QuickBooks Web Connector Invoice Transfer History
Autotask will maintain a record of each transfer to QuickBooks for 100 days. Each type of transfer is logged on a different page, but the pages are largely identical except for the transfer type. To open the page, use the path(s) in the Security and navigation section above.
The following Transfer History pages are available:
- Invoice Transfer History
- Expense Report Transfer History
- Timesheet Transfer History
- Purchase Order Transfer History
- Inventory Synchronization History
The Transfer History pages are intended to assist with the troubleshooting of transfer failures. For some transfer types (i.e. invoices), they replace the text log file in the legacy integration. Other transfer types (i.e. timesheets) previously offered no logging at all.
The Transfer History pages
![]()
On the Transfer History pages, each row in the table represents one transfer batch. The first row is a filtering row. You can filter by transfer start date and time, transfer end date and time, and web connector name.
Three separate columns show the number of items that was successfully transferred, the number still pending, and the number that failed transfer.
- To view the transfer details for the entire batch, click the details icon
 .
. - To view the transfer details filtered by transfer status, click a number in the Transferred, Pending Transfer or Failed to Transfer columns.
The Transfer Details dialog page will open.
The Transfer Details dialog pages
![]()
Each row on a Transfer Details dialog page represents one item (invoice, expense report, timesheet, purchase order) in the batch.
- To view the Autotask version of the item (invoice, expense report, timesheet, purchase order), click an item in the ID column.
- To open the QBXML transfer record for an individual item, click the details icon .
NOTE A complete inventory synchronization is done in batches. Each row in the Transfer Details table represents a Product. However, the QBXML is generated for the entire batch and can be opened by clicking the QBXML button at the top of the table.
Individual records do not contain QBXML files.
The QBXML records
Clicking on the details icon ![]() opens the transfer record in QBXML format. The top section will provide key information about the individual item.
opens the transfer record in QBXML format. The top section will provide key information about the individual item.
- If the item was successfully transferred, the Transfer Status will simply show as Transferred.
- If the transfer failed, Transfer Status will show as Error, and an error message will be displayed that will explain why the transfer failed. Often, the error message will provide enough information to correct the error.
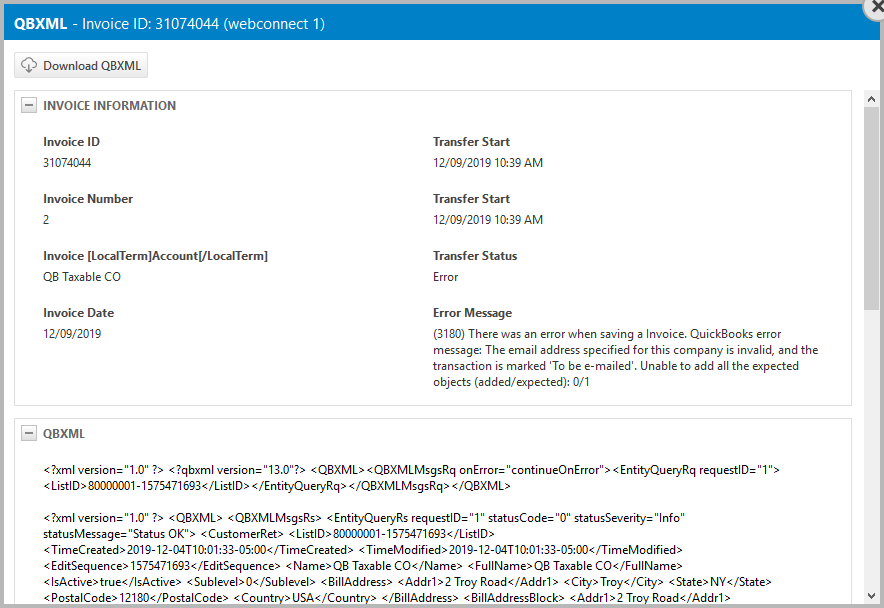
If you need assistance, you can download the QBXML file and attach it to a Kaseya Helpdesk request. It contains key information that will assist our team with troubleshooting your issue.


